Add Google +1 Button to Blogger

How to add Google +1 Button to Blogger

After the introduction of Google +1 button (Plus One), it has become a trend for the publishers to add it to their websites and blogs, whether it is hosted on Blogger or WordPress. So the general question that will pop up in our minds is what is so popular about this +1 button?
Well, the answer is, when you finds a web content to be useful and click Google +1 button to share it on Google+, it will not only help your friends and contacts on Google+ Circle to get to know about the interesting content but will also help them to find more relevant search results on Google.
Google +1 button
Now let us start the discussion about why you are here, that is, to add Google +1 button to Blogger posts. It can be done by two ways, first is a very simple way where you have to only enable some settings and you are ready to use it and next is the advance way where you have to edit Blogger template to include Google Plus One button.

Easy Way

If you want an easy way then Blogger has already enabled it for us, all you need is to turn on the official share buttons which includes Google +1 button. It can be found under Layout tab; click the “Edit” link under “Blog Posts” gadget, select “Show Share Buttons” and save it; but I must say that you cannot customize or can choose any other sizes.

Blogger official share buttons

Advance way

It comes handy when you are thinking to add Google +1 button within Blogger posts with a different size and/or type on your desired position manually.
Step 1: Login to Blogger and go to your blog’s Template tab.
Step 2: Click “Edit Html” and check “Expand Widget Templates”.
Step 3: Configure the the below options to generate Google +1 button code for Blogger and copy it.

Button options

Size:
Annotation:
pixels (?)
Language:

Float:
Show on:

Preview and code

<b:if cond='data:blog.pageType != &quot;static_page&quot;'>
<div style='float: none;'> <div class='g-plusone' data-size='tall' data-annotation='bubble' expr:data-href='data:post.canonicalUrl'></div> </div>
</b:if>
Step 4: Find <data:post.body/> and before or after it (or if you want you can add it in both places to show Google +1 button above and below Blogger posts) add the above code.
Step 5: Find </body> and immediately before it add the below script.
<script type="text/javascript">
  window.___gcfg = {lang: '<data:language/>', parsetags: 'onload'};

  (function() {
    var po = document.createElement('script'); po.type = 'text/javascript'; po.async = true;
    po.src = 'https://apis.google.com/js/plusone.js';
    var s = document.getElementsByTagName('script')[0]; s.parentNode.insertBefore(po, s);
  })();
</script>
Step 6: Save your template.

Attributions

  • Size - Google +1 button is available in four sizes.
  • Annotation - If you select ‘inline’ you will get to set the width. The default width is ‘450’ pixels while the minimum recommended is ‘120’. Only your friends’ faces will be seen if they have +1ed the post.
  • Language - It will get to your blog’s default language but you can always set it to your locale language.
Points to note:
  • I have gone with the asynchronous script in step 5. I have found out that sometime it fails to load if it’s not placed immediately above the closing body tag. If you are facing such problems then add the simple onload version instead.
    <script type="text/javascript" src="https://apis.google.com/js/plusone.js">
      {lang: '<data:language/>'}
    </script>
  • For more information, visit Google +1 button documentation page.
  • Create Google Plus page for you blog to gain more exposure.

Add Google Website Translator to Blogger


How To Add Google Website Translator to Blogger

Why use any other translate widgets with or without images of country flags when Google translator widget can translate texts of any webpage and is capable of translating to 64 different languages (and increasing) automatically and instantly to readers speaking language.
Google translator for websites can be added to any website or CMS, like WordPress, Blogger, Tumblr, etc. with ease. While the steps of adding this widget is all same but here I will mainly write about how it can be added to Blogger blogs.
Blogger has this widget, you just need to go to your blog’s Layout tab and click “Add a Gadget” link. A popup page will open, scroll down below and you will find the Google Translate gadget.
Blogger Translate Gadget
But there aren’t much options to select from to customize it, that’s why let’s add it in a different way.
Step 1: First of all you need to have a Google account. If you blog on Blogger then you already have it, all you need to do is sign in and go to Translator sign up page.
Step 2: After clicking “Add to your website now” you will be redirected to Website Info where you have to add your blog’s URL and then select that language that you primarily use to write your articles.
Translate widget settings - Website Info
Step 3: On clicking “Next” you will be redirected to Plugin Settings page where you can change the options for your translate widget.
Translate widget settings
  • Translation languages – Here you can choose to translate your page to specific languages but it’s best to select “All languages”.
  • Display mode – You can choose how you want your widget to be and look like.
  • Advanced – You can find there what are each options for and select it accordingly. “Automatically display translation banner” option is selected by default. It’s very interesting to know that Google translation API can detect the readers speaking language and according to this it will translate the texts of the webpage automatically!
Step 4: After clicking “Get code” button you will be redirected to the page where you will be provided the codes that you have to add to your blog.
Translate widget settings - Get code
So if you are with Blogger then go to Template tab of your blog, click “Edit HTML” button and find </head> snippet. Above this add the Meta tag (see the image above, it’s marked with red tick) and Save your template.
Now to display the Google translator widget you can add the snippets (marked with green tick) anywhere you want within your Blogger template. The best way is by adding a “HTML/JavaScript” Gadget on your sidebar which can be found under the Layout tab > “Add a Gadget” link.

Other Translation Widgets

Google is not the only one to provide this but there is Bing Translator for websites too. Adding it to Blogger is almost the same and easy. But you have to choose which widget you want to have for your blog.

Add Description Meta tag to Blogger

How to add Description Meta tag to Blogger

Adding Description Meta tag is one of the good SEO practices. These tags are HTML attributes which tell the search engines about the content of the page and describes it. Description tags don’t helps in ranking high within search result pages but helps in good clickthrough rates.
Many years back, search engines used to show the result snippets of these Description Meta tags but recently some search engines, like Google, shows preview snippets depending on user searches.
Google description snippet
Just like any other top CMS, like WordPress.org, blogs powered by Blogger also have the feature to add Description Meta tags to every page, you just need to enable some settings, in this tutorial let us see how.

Check for the required codes

First and foremost thing that you should do is to check for the required code which will actually add the Description Meta tags within your Blogger templates. So go to “Template” tab of your blog from the dashboard and then click “Edit HTML” button. Now find the the below code:
<b:include data='blog' name='all-head-content'/>
If the above code is there then you don’t have to add any other codes. But if you have edited and customized your templates where the above cannot be found then only add the below codes after <head>.

<b:if cond='data:blog.metaDescription != &quot;&quot;'>
  <meta expr:content='data:blog.metaDescription' name='description'/>
</b:if>

Turning the feature On

From your blog’s dashboard go to Settings > “Search Preferences” tab > Meta tags > Description > click “Edit” and select “Yes” for “Enable search description?”. Within the textarea write a brief description about your blog. This will add description Meta tag to the homepage.

Blogger SEO settings
Blogger description settings
Note: Whether you write something on the textarea or not, don’t forget to click the “Save” button, otherwise you will not be able add Meta tags to your posts.

Adding Description Meta tag to Posts and Static Pages

While writing a new post from Blogger Post Editor, find for “Search description” on right-hand side panel under Post Settings. Click it and a box will open where you can write a very brief description about your post, click Done and then if you think that your article is ready to get published, click the “Publish” button. This will add description Meta tag to your post. The same way, you can also add Meta description tags to your older posts by editing them.

Blogger posts description

How many words?

Description Meta tags should not be too long or too short. The best is if you keep it under 160 characters but above 85 characters, including spaces of course.

Invite Contributors to your Blogger Blog

How to Invite Contributors to your Blogger Blog

Blogger has added security measures to keep people from hacking into your account by detecting remote log ins. These extra steps don't occur all the time, but they do make it tougher to me to log-into your account to install your blog design. Therefore, I am asking that you invite me to be a contributor on your blog. This is a 2-step process.

1. Under your settings you will see a place to add authors. Click that and put in the email address of the person you want to invite to be a contributor on your blog. Once they accept they can post, but not edit anything on the blog. For a blog design installation, I need access to everything so please see step 2.
2. Once the person has accepted the invitation you can make them an admin by pulling down and clicking admin to the right of their email address. This gives them full access to your blog & template.

Help! My Button Copy Box Changed!


Blogger has made some recent changes to their templates & coding and it has messed up people's button copy & paste box. If you leave the widget/gadget that contains the button code alone it seems to be fine, but if you touch that widget at all (even if you open and hit cancel) the coding changes and it looks like this~
 
Code it Pretty has come up with an updated coding that works with the Blogger updates. You can find that tutorial HERE. When you open the widget/gadget make sure you copy what is there because it contains the direct link to the button.

Blogger Template Installation Guide

This tutorial will show you the way to install a blogger template for your blog.

1. Download your  template using the "Download Now" link (as a zip file).
Download Blogger Theme
2.Now unzip this zip file using a software like Winzip, WinRAR,...
Unzipped Theme Folder
3. Login to Blogger account (http://www.blogger.com/home) and click on your blog name. Click on "Template".
Click on Template
4. Now click on "Backup / Restore" button.
Click on Backup Restore Button
5. Download your current template using the "Download full template" button.  Save it to your hard drive and keep it in a safe place. Because if you face any problem with new template installation, you can upload your old template again.
Download full template
6. Now use "Choose File" button to select your new blogger template (you can find it as a .xml file inside unzipped folder in step 2). After that click on "Upload" button. Wait few seconds until upload is completed.
Browse and Select Your New Blogger Template
Now you have successfully installed your new blogger template.
7. Go to "Layout" and arrange your widgets as you like.

Free Internet Axis March 2014

Operator AxisFree Internet Tricks Axis March 2014, How to surf Internet with Axis Card Month for March 2014 - I Update Information this time around trick easily surf the Internet with the Axis trick in the month of March 2014. Trial optimation in West Java. This information is specifically for my friend who likes to internet free on mobile phone.
Having previously shared and updated articles Free Internet Tricks XL so this time of axis. Here is a simple trick Free Internet with the latest Operator Axis March 2014, directly below.

     SETTING in Mobile:
     APN: AXIS
     Proxy: 25.6.3.8
     Port: 8080

     SETTING In Web Browser OPERA MINI:
     HTTP SERVER: http://0.facebook.com.server4.operamini.com:80 Socket: STANDARD
     Remove: Tick
     Proxy Type: HTTP
     Proxy Server: Server4.operamini.com

Update (If the antecedent is not available, try the one below)


     Setting Access Point
     APN: axis
     Proxy: 097,103,006,197
     Port: 80

     Opera Mini Handler Setting
     Back Query:? 0.facebook.com

So few easy tricks that I can give to my blog netter. May they succeed and say yess. Those who do not succeed try it again until the problem could be a possibility for setting your hp each. A few simple tricks Free Internet article Axis March 2014, or Free Internet Trick Telkomsel March 2014 Thanks!

Free Internet Trick Telkomsel March 2014

Free Internet Trick Telkomsel March 2014

Telkomsel continued to spur growth of telecom networks across Indonesia are rapidly while empowering the community. Telkomsel became the pioneer of mobile Telecommunications technologies in Indonesia, including the first launched international roaming services and 3G services in Indonesia. Telkomsel is the first operator tested LTE broadband network technology.

Telkomsel Flash is a wireless internet service (wireless) provided by Telkomel for all of its customers (card HALO, simPATI and As). The service is supported by technology that can produce HSDPA/3G/EDGE/GPRS TELKOMSEL download speed up to 14.4 Mbps.
 
Because internet telkomsel still expensive, a lot of internet aficionados looking for loopholes to look for free internet tricks. And here's a collection of free tips telkomsel card August 2013.
Free Internet Trick Telkomsel Via Operamini Handler
Free Internet Trick Telkomsel Via Browser HP Handler
Free Internet Trick Telkomsel Via UCWEB Handler
Free Internet Trick Telkomsel Via Ebuddy Handler
Free Internet Trick Telkomsel Via PC
May be useful.

How To Quick Edit Posts

Quick Edit Your Posts | Mean quick edit your post

Have you ever seen a little pencil at the end of a post on some blogs? Wondered what it is for? It's the post quick editing tool. Just click on it and the post comes up to edit. You must be logged into your own account for to use it. Don't worry...others can't click it and edit your posts.

If you don't have the pencil showing but want it...here is what you do. Click on layout.

1- Click edit on the Blog Posts box

2- Configure blog posts window comes up and make sure Show Quick Editing is checked, and then click SAVE.

OK...WHY would you want the quick editing to show? Are you a person that has to go back and fix a mistake or change a post? This is much quicker than going to the posting tab at dashboard, and then clicking edit posts, then looking through the list to find the post you want. Save yourself some time!!

Backing Up Posts

How to backing up post | Solution to backing up post

Here is how you back up your blogger posts.

1- Click on Settings
2- Click Export blog
3- DO NOT DELETE YOUR BLOG!!!!!!

This will back up all posts you have, not just today's posts. Obviously you'd want to back them up from time to time to make sure you get current posts.

OK...how easy was that? You can also import blog posts (which you might want to do if you start a new blog and want to move posts over.) The Blogger Buzz has a more in depth post about exporting/importing posts. Check it out here.

Backing Up Your Template Blog

How To Backing Up Your Template?

I've had a few people ask me what they can do to make sure they don't lose their awesome blog design. It's a great idea to back up your blog template. Here are the steps.

1- At blogger dashboard click on Layout.
2- Then click on Edit HTML
X- Make sure you don't Pick New Template. If you do, and then actually pick a new template the design that you have will disappear!

Then the following page will come up.


1- Click on Download Full Template and download the template. It will be named something like template-282235459.xml. You can rename it, but don't alter the extension. I like to rename mine something like CDBtemplate-21509.xml
X- Don't mess with the code at all!

What is a Blogger Page?

Many clients have asked me about Blogger pages and how they can use them on their blog. I will explain what they are and how to create them in this post.

Blogger pages let you to publish/post static/fixed information on stand-alone pages linked from your blog. For example, you can use pages to create an About page that discusses the evolution of your blog and information about you, or a Contact Me page that provides your personal contact information such as your email and phone number as well as your social media contacts such as Facebook and Twitter. Blogger pages is not recommended for information that changes frequently such as current giveaways or dates of events.

You create a Blogger page similar to how you write a blog post. From your Blogger Dashboard click the Posting tab, then Edit Pages tab, then click New Page. You will publish it just as you publish a post. Blogger allows 10 stand alone pages per blog.
Here is what it looks like on the new Blogger interface.

Once your page is published, you can link to it from the new Pages widget. The Pages widget lets you add links to your pages as tabs at the top of your blog, or as links in your blog's sidebar. (Note: existing third party templates and special template designs I create may not support pages as tabs, but pages can still be added as links in your blog's sidebar) I prefer to not show the pages widget and instead link the pages manually in most of my designs. You have to click NO GADGET when you go to publish/edit your pages if you want to manually link them.

The rest of this information is for people who want the Pages Widget/Gadget to show.
In the Pages widget, you can decide which pages will have links, and in what order they will appear. You can also choose whether or not you want links automatically created for pages when you create them by checking or unchecking the box to the left of Add New Pages by Default.
 
You can get the direct URL to your Blogger page by clicking View on that particular page at the Edit Pages screen.

Are You Making These Mistakes With Your Guest Posts?

During my writing career, I’ve had the good fortune to have appeared on many cool and informative blogs and websites – but it hasn’t always been this way. Writing for blogs appeared to be not as easy as I at first thought, and I must confess that the more I learned the nuances of guest blogging, the more the fear ate at me.  There were a few moments when I just wanted to give it all up despite the fact I liked the process of writing itself. But there are no results without trying, and I’ve improved over the years I’ve been guest blogging.
Now as I look back, I can see my mistakes were so obvious and easy to avoid. If you are a newbie to the world of guest blogging, or you are going to start it in order to get your name out there, you should know and remember some of the unwritten rules to follow. I am here to share my biggest mistakes and help you avoid the same traps.

Give me more! More blogs! 

The first mistake: I wrote guest articles for everyone. Literally. I believed, that the more articles of mine were published – the better results they would bring to my websites. Every blog, even if it had low PR and DA, had a chance to get a guest article from me. Moreover, the majority of these blogs were full of ads, they had a bad content, awful (let’s be honest) design, and no social presence at all.
Remember: quantity does not mean quality. If you want to become a good and respectful guest blogger, you should always pay attention to blogs you are going to write for. The main aspects to pay attention to:
1. A blog’s traffic (it’s easy to check on SemRush): pay attention to all ups and downs, and the ideal variant is no downs at all (of course!). The great example of such a website is essay-all-stars.com:
screenshot-12. Is this blog clean? (How many ad blocks are there? How often is the content being updated? Are the comments moderated there?)
3. A quality of this blog’s content (just take a look whether all articles have affiliate links and are built to sell something or not. Never write for those websites, as backlinks from them will bring nothing good to your own blog).
4. Does this blog have a niche? It’s better not to write for those blogs that do not have any specific niche: it means they do not take care of their content at all. Yes, it will be much easier for you to publish your article at such blogs, where one article is about blogging, and another one is about selling TVs or e-books, but such backlinks will not bring you any good reputation at all. When I speak about reputation, I mean both your reputation as a guest author and the reputation of your own website for search engines.
5. What are this blog’s Domain Authority and PageRank? It would not be a good idea to write for websites with DA less than 30. As for PR, we all know that the bigger it is – the better, but I can say from my personal experience, that a big PR does not guarantee a blog’s authority: if you see, that the content of this blog is not good, but its PR is still high, the big chances are that this PR was created falsely.

A Topic? Whatever…

My next and very serious mistake was writing guest articles on ALL topics, even if they had no connection with the niche of my own blog. Example: my blog is about essay writing, but I write an article for the blog about fashion or concept gadgets.
Yes, these tech or fashion blogs were really good and informative; they were clean, they had high ranks, they were authoritative, but… my link did not look natural there, and search engines found it artificial as a result. Yes, it was unfair, because I KNEW all my links were naturally created by me, but… c’est la vie. The more such backlinks you have – the bigger your chances are to be banned by Google.
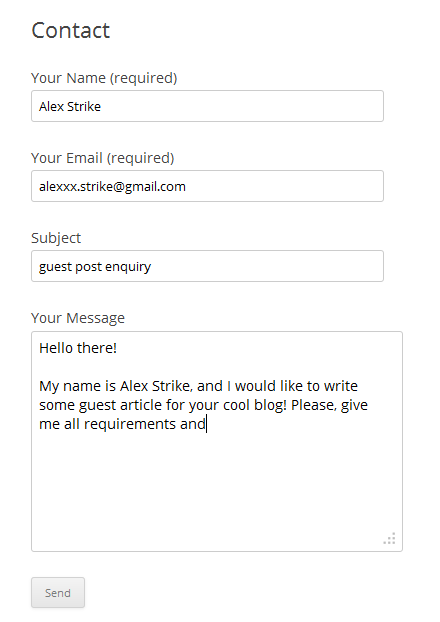
Who Needs E-Mails?

I am sure you know that many blogs or websites have a Contact Us page. Yes, it’s good and logical of course, but very often such a page looks the following:
screenshot-2
I must say, that when I contacted bloggers via such forms, only 1 out of 20 could give me a reply. Now I know that a good website will always share some exact contacts with its visitors (it may be e-mails of support teams, this blog’s founders, editorial teams, etc., but you will definitely find EXACT contacts there).

Hello Admin!

The very important moment of guest blogging is outreach and your pitches. And here was my BIGGEST mistake probably. Just take a look at the screenshot above, and you will understand what I mean.
Mistakes:
1. Too general (a blogger receives 100 letters a day. Why should he pay attention to yours?)
2. No names (do not be lazy, and read About Us pages of websites, as you can always find bloggers names there). I think you will agree, that “Hello John!” sounds much better than “Hello Admin!” (moreover, big chances are that this person is not admin actually).
3. No information about yourself. Always tell them who you are (but there is no need to describe every moment of your biography), give them some examples of your previously published works (links I mean) to see your writing style.
4. No pitches. Take a look at a blog’s content and try to provide a blogger with some posts ideas that would work well for him. Try to offer something up-to-date, exclusive or unusual, that was not published at other blogs 100500 times before. Take into account the general style of this blog: if it is known for its “Top 10…” lists, it would be strange to offer them something like “Dos And Don’ts Of Writing A Paper” for example.
Here is the example of my outreach letter for today:
screenshot-3
Certainly, you are free to create your own outreach letter that will work well for you. Just try not to repeat my mistakes described above.

By-line Is My Savior 

Yes, some websites allow you backlinks only in your by-line (author’s bio). I do not want to say that it is bad, but you can always use a chance to put your link to the body of your text, where it will look natural, and it will fit the content of this article itself.
One more mistake of mine was the usage of keywords as an anchor. Please, compare these two by-lines, and try to guess which one looks more suspiciously for search engines:
screenshot-4And
screenshot-5It is always better to promote your brand and make it recognizable, than use keywords to please Google (it is not as stupid as some of us still believe). Moreover, you can always use keywords in the texts of your article itself where they will look good and natural.

Summary

If you want to become a good guest blogger, always pay attention to WHAT you write and for WHOM you write. Proofread your articles (my sin is spelling mistakes, and I am still trying to defeat them all), try to provide only interesting content to your potential publishers, be polite, look and write professionally, and never be in a hurry!
It is always better to spend more time on writing and publishing your article at one cool and respectful blog than kill your precious time on writing a content and building backlinks that will not bring you any profit at all.
Alex Strike is a passionate writer of Lifehack and a blogger who writes on the topics of education, content marketing, writing, and lifehacks. You can always find more of Alex’s work on .

Free internet trick Hand Phone / HP java ( avenged community ) 2014


Options for this news
1 . Free Internet Tricks Axis
setting Mobile
Apn : AXISmms
Proxy : 10.8.3.8
Port : 8080
or
setting Mobile
Apn : AXISwap
Proxy : 195 189 142 132
Port : 80
Setting Opera Mini Handler
Remove Port : Tick
Proxy Type : HTTP
Proxy Server :
- Or wap.axisworld.co.id
- 0.facebook.com

Trick Free Internet Telkomsel March 2014
Setting Hp / Mobile :
APN : Telkomsel
Proxy : 141.0.11.31
Port : 80

Setting Operamini Handler :
http://m.skype.com/sitecheck.opera.com:80
socket :/ / m.skype.com / sitecheck.opera.com : 1080
Proxy type: Host
Proxy server : m.skype.com / login.yahoo.com
( The others leave it alone )
or
Set Opmin Handler :
Http Server : http://reg.citrongo.com/ @ mini5.opera - mini.net : 80 /
Socket : socket :/ / reg.citrongo.com @ mini5.opera - mini.net : 1080
Front Query : Blank
Remove : Tick
Proxy Type : Host
Proxy Server : 0.facebook.com

Free Internet Tricks XL March 2014
Free Internet Tricks Latest XL
TRICK 1 ( VIA BROWSER HP )
APN : www.xlgprs.net
Proxy : 69.64.52.133
Port : 80
How to use : First visit www.xlklik.com first, then enter the destination address in the URL box pal and then click Go .

TRICK 2 ( VIA UCWEB HANDLER )
SETTING HP
APN : www.xlgprs.net/
Proxy : 66.154.119.83
Port : 80

Good Luck, may be useful...

XL Free Internet Trick Or Modem HP 2014

How to  XL Free Internet Trick Or Modem HP 2014

Not need me to explain even longer may you all have to be smarter than me how to use Inject Latest XL Free Internet Trick 2014 XL 2014 . To be sure I 've tried on the XL card Toll -Free with $ 0 , - Without any package without route ( since no pulse and not worry so hit quota runs out ) with Dropbear SSH and the results I can use to post Inject New 2014 XL Free Internet Tricks XL 2014 here :

Let me understand my explanation would love keepsake picture to ente below :


To obtain Inject Latest XL 2014 XL 2014 Trick Free Internet is not hard just follow the link below after ente skip my ad ( ane selling better than advertised only) :

Inject Download Links Latest XL 2014 XL 2014 Free Internet Tricks

Link Password Inject Latest XL 2014 XL 2014 Free Internet Tricks

Free internet trick xl HP 2014 : Step 1 . Read first sob prayer let smoothly Step 2 . Provide Hp Step 3 . Go to menu > settings > internet settings Step 4 . input these settings APN : internet PROXY : 69,195,138,144 PORT : 80 HOME PAGE : 123.xl.co.id step 5 . first entered into ; http://123.xl.co.id later there was a column of the URL and enter the URL / address ...

Make Floating Ad

 How to Make Floating Ad with two time Click Close, could make the owner of the blog will be flooded with advertising clicks. How to Make Floating Ad with two time Click Close - Comrades reading about Floating Ads - Make your Adsense Hovering with Close Button or How to Make a Floating Ads Click Close, this post is almost the same as the second post (for those who have not read please read well, hehehe).

But How to Make Floating Ad with two time Click Close, closing floating ads are different. If this post is recommended to our blog visitors to click-click close to 2 times while the previous post was only one time close.
Because to see the main article on the blog should be shut down or click on ads that float, usually done by way of such an interconnected blogs / posts containing about "SPECIAL ADULT". The disadvantage is the lazy visitors visiting your blog because it adds time to click on ads floated earlier. So ... all depends on your friend, willing to try, try How to Make Floating Ads Click Close to 2 this time please. Honestly, AB did not like to use it.

Here's How to Make Floating Ad with two time Click the Close:

A. As always, open a blog account comrades.2. Go to the Layout / Design3. Select the Add a Gadget / Add Widget4. Select the element HTML / Javascript5. Copylah scrip below, then paste into the gadget / widget you want to add earlier.<style type="text/css"> 
<style type="text/css">

#gb{ position:fixed; top:10px; z-index:+1000; } * html 
#gb{position:relative;} .gbcontent{ float:left;margin-left:220px; border:2px solid #bb0000;background:#eeeeee; padding:10px; } 
</style> 
<script type="text/javascript">

function showHideGB(){ var gb = document.getElementById("gb"); 
var w = gb.offsetWidth; 
gb.opened ? 
moveGB(0, 30-w) : 
moveGB(20-w, 0); 
gb.opened = 
!gb.opened; } 
function moveGB(x0, xf){ 
var gb = document.getElementById("gb"); 
var dx = Math.abs(x0-xf) > 10 ? 5 : 1; 
var dir = xf>x0 ? 1 : -1; 
var x = x0 + dx * dir; 
gb.style.top = x.toString() + "px"; if(x0!=xf){setTimeout("moveGB("+x+", "+xf+")", 10);} } 
</script> 
<div id="gb">
<div class="gbtab" onclick="showHideGB()">
</div>
<div class="gbcontent">
<div style="text-align: right;">
<a href="javascript:showHideGB()"> .:[Close][Klik 2x]:. </a> </div>
<center> 
Please place the code or text ad or banner or something up here</center> 
<script type="text/javascript">
var gb = document.getElementById("gb"); gb.style.center = (30-gb.offsetWidth).toString() + "px"; 
</script></div>
</div>
6. Have kept Gadget / Widget that you just created.7. Save your template. Then publish. See the results.Note:Please replace the letters in red with the number that corresponds to the position you want.Please replace the letter in blue with the ad code, banner code that you want.Not all providers of ad (adsense) recommends to use a trick How To Make Floating ads, carefully chosen, usually kumpulblogger not disputed.Read here How to get Adsense Together KumpulBloggerHow to create a floating ad placement you can use on other widgets like the Fan Page Facebook or other Social Media ..See examples of ad creation Hovering with two time Click Close disiiniHow, is not easy. That's How To Make Floating Ad with two time Click Close. Well hopefully useful, best regards and greetings successful blogger.